Please refer to the "User Manual - Student" for non-teacher specific instructions (e.g. changing your password, accepting the usage agreement, starting a notebook, etc)
Basic Topics
How to request logins for a course
You can provide a list of all students (first name, last name, e-mail address) in semicolon ";"-separated file format (.csv) through the Servicedesk (https://servicedesk.surf.nl/jira/plugins/servlet/desk).
Specifying course hours
The times at which the large reservation (intended for course hours) is available is agreed upon beforehand between SURF, the local ICT and/or the teacher. Please note that we need to put reservations in at least 5 days in advance in order to make sure the required amount of hardware is available. Allowing some time for us to process your request, this means that you'll typically need to notify us at least a week in advance on changes when this large reservation should be available. The maximum total duration of this large reservation is agreed upon in the contract with your local ICT, so it is important to only request the larger reservation when needed.
Logging in
Each course uses it's own hub. The hubs are running at https://jupyter.snellius.surf.nl/<coursename>. The 'coursename' will be agreed upon before the start of the course and will have either been communicated to you either by SURF or your local ICT contact.
Further instructions on loggin in can be found in the Student Manual.
The Jupyter Notebook session
After launching a Jupyter Notebook server, you should see something similar to the following screen
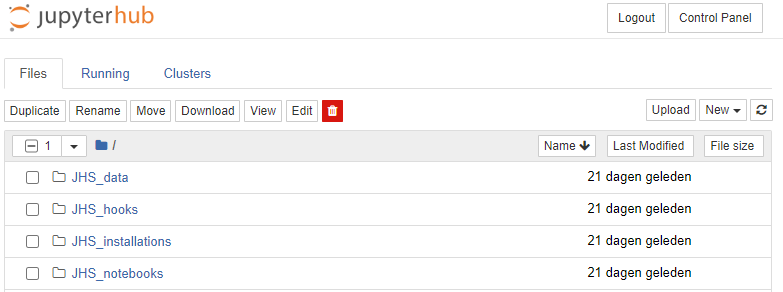
These are the files and folders present in your home directory. There are a couple of special folders starting with JHS_*, the use of which we will explain in this guide. In general, these give you means to share data, notebooks, and installations (e.g. additional Python packages) with students.
Basic navigation, create/move/remove folders, create/move/remove files, uploading/downloading files
Please see the User Manual for Students
Working in a notebook
Please see the User Manual for Students
The admin panel
An admin panel can be accessed. If you are not running a Jupyter Notebook server, click the 'Admin' button at the top to access it. If you are already running a Notebook Server yourself, you will need to click the 'Control Panel' in the top right first, after which the 'Admin' button will appear at the top.
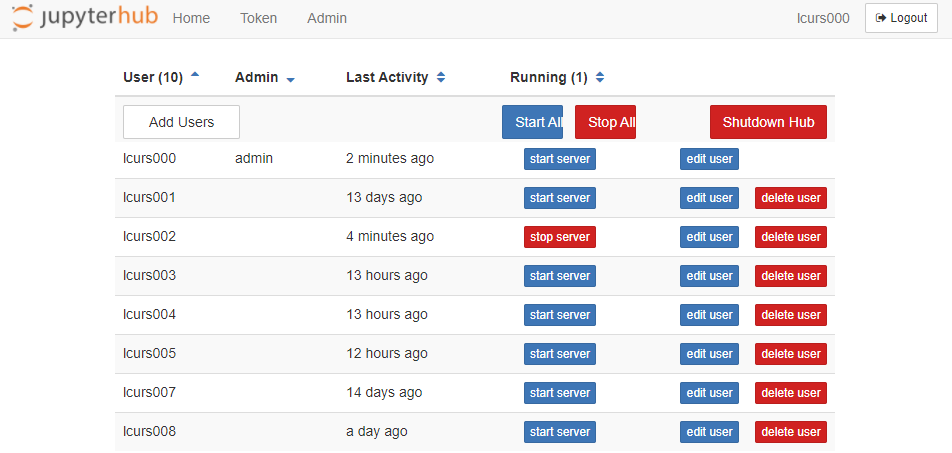
The admin panel shows all the logins that have recently logged in, and shows which logins are currently running a Jupyter Notebook server. For example, in the image below you see that the student with login 'lcurs002' is running a Jupyter Notebook server. If needed, you as a teacher can shutdown this Jupyter Notebook server by clicking the 'stop server' button behind that particular login. Note that we use the login database of the host system (Snellius) to authenticate users, not the internal login database of JupyterHub. Thus, it is not possible to add users with the Add Users button. Also, please do not use the 'edit user' button. This will make the internal login database of Jupyterhub go out of sync with the login database of the host system. The delete user button is also not functional . Though clicking it will shutdown ánd logout the corresponding user, this change is not persistent and the user can simply re-login.
Sharing notebooks with your students
The JHS_notebooks folder and its sub-folders are intended for you to distribute your notebooks to the students. Anything placed in this folder is automatically synchronized (i.e. copied) to the students whenever the student starts a new Jupyter Notebook server. To prevent overwriting any of the student's changes afterwards, only files that do not exist yet in the student's home directory are copied. The only way for the student to receive your original copy again is for him/her to throw away their copy, shutdown the Jupyter Notebook server, and start a new Jupyter Notebook server again.
If you want to prepare notebooks, but don't want to share them yet with your students, simply save them in your home directory. The files will already get the correct permissions so that if you later move the file to JHS_notebooks, they get synchronized.
You may want to gradually add new notebooks to the JHS_notebooks folder during the course-progress, so that students only see the notebooks relevant for the current lessons. Also, you can organize your notebooks in subfolders with in the JHS_notebooks folder if you want: the complete directory structure is synchronized to the students.
Example: preparing and a sharing notebook with your students
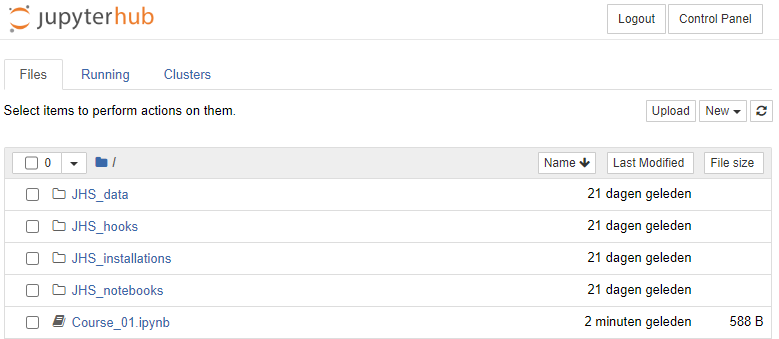
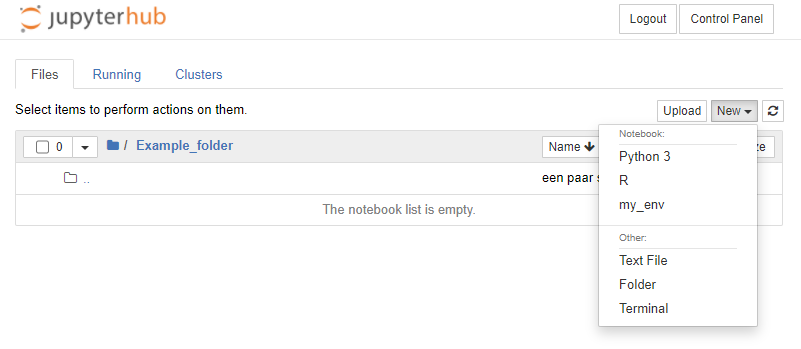
In this example, we prepare a notebook "Course_01.ipynb". To prevent this file from being copied to students while we are still developing it we prepare it in our home directory, where we create a new notebook with the 'New' button, and renamed it as 'Course_01.ipynb'
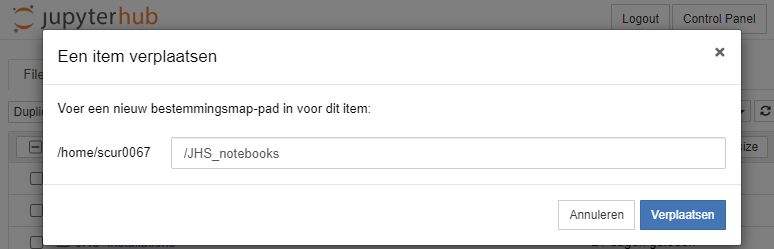
Once we are finished preparing, we can move it to the JHS_notebooks folder by selecting the checkbox befor the 'Course_01.ipynb' file, click move, and enter '/JHS_notebooks' as destination:
The notebooks from the JHS_notebooks folder are synchronized to the student as soon as a student logs in to the Jupyter Hub.
Sharing data with your students
You want to use example data (e.g. a csv dataset, or a dataset of images) in your course and work with that data in the Jupyter Notebooks. There are two ways in which you can share such data with your students:
- You can place your data files in JHS_data
- You can place your data files next to your notebooks in the JHS_notebooks
We strongly encourage the first approach, as described in more detail below.
Sharing data through JHS_data
The JHS_data folder is intended for sharing read-only data with the students. The data is not copied to the student, but can be accessed from notebooks by referring to it with the full file path. This is a very efficient way of sharing files: the file only needs to be stored once (saving storage space), and read performance is much better if a large group of students read a single file, compared to when they would each read their own copy.
Python Example
Suppose we have a text file "example.txt" we'd like to use in one of our notebooks, we first construct the path where the file can be found with the following code snippet:
import os |
Note that the environment variable TEACHER_DIR refers to the top level directory of your course material. Thus, 'fullpath' now contains the full file path to your "example.txt" file. The nice thing about using the TEACHER_DIR environment variable over hardcoding is that this code is portable: next time you setup a new course, and would run the same notebook, it will refer to the top level directory of your course setup.
After constructing the filepath, you typically want to open and e.g. read the file
file = open(fullpath, 'r') |
(this part of the code of course depends on what type of file you're using in your notebook, for normal text files, we use the open() function). Since the 'fullpath' refers to a file in the JHS_data directory (which is readable to your students), all students will be able to execute this Notebook and work with the data.
R Example
The equivalent example code in R would be:
teacher_dir <- Sys.getenv(x=c("TEACHER_DIR")) |
(assuming the text file contains tabular data that read.table() can import).
Sharing data through JHS_notebooks
WARNING: sharing data through JHS_notebooks is acceptable only for small files (at most a few MB), but should be avoided for large files! If all students read their own copy of a large file when executing a notebook, it would cause the filesystem to slow down to a crawl.
The designated way of sharing files is through JHS_data. However, there may be cases where it is necessary that students have their own copy of the data files, for example because you want them to edit these. In that case, you can store files in JHS_notebooks: each student gets their own copy of the data file, just like each student gets their own copy of the notebooks. The downside is that it increases the amount of storage used and if a large group of students starts to simultaneously read files, this can substnatially impact the performance of the file system. That is why we ask that you use JHS_data for datasharing whenever possible.
Starting a Linux terminal
Apart from notebooks, you can start a Linux terminal from a Jupyter Notebook server. A Linux terminal is the most flexible way of interacting with a Linux system, and will for example enable you to install additional packages, or create/move/rename files from the terminal.
To start a terminal, from your running Jupyter Notebook server, press 'New' and click 'Terminal' from the dropdown menu. This will open a terminal like the one below:

Here, you can use the regular Linux shell commands to work on the system. One thing you can use this for is e.g. to install additional R or Python packages (see instructions below).
Installing additional Python packages
R and Python packages that are installed in the appropriate subfolder within JHS_installations are automatically picked up by the student logins as well. This is because the JHS_installations folder is also readable (read-only) for all students associated with your teacher login. Thus, if you perform a single installation of an additional R or Python package, all students can run that same R or Python package using your installation.
To install a Python package in the correct folder, run
pip install <package_name> --user |
IMPORTANT: In some cases, the file permissions are not set correctly by the pip installation process. To make sure the installed files have the correct file permissions, so that the are readable by your students, run
find ~/JHS_installations/Python -not -perm -g=rX -exec chmod g+rwX {} \; |
after having performed all your Python package installations. If you later decide to add another Python package, it is recommended to run the above 'find' command again to ensure the correct file permissions.
Installing additional R packages
To install an R package in the correct prefix, click 'New' and start an R notebook. In the notebook, use the install.packages command with a custom 'lib' argument to install in the ~/JHS_installations/R/ folder. For example, to install the 'metafor' package, one would run
install.packages("metafor", lib="~/JHS_installations/R/") |
IMPORTANT: In some cases, the file permissions are not set correctly by the R installation process. To make sure the installed files have the correct file permissions, so that the are readable by your students, open a Terminal (see instructions above) and run
find ~/JHS_installations/R -not -perm -g=rX -exec chmod g+rwX {} \; |
after having performed all your R package installations. If you later decideto add another R package, it is recommended to run the above 'find' command again to ensure the correct file permissions.
Advanced Topics
With the setup covered in the Basic Topics, most teachers will have enough flexibility to run a course according to their needs. The following section of advanced topics are intended for teachers who have a good knowledge of Linux systems, and who require the ability to further customize their Notebook environment. We support this in a limited way: we make sure that it is possible, e.g. by providing the JHS_hooks (see below), but can not help you set up your customized environment.
Logging in through SSH
If you are comfortable working with a terminal on Linux, you may want to connect to Snellius with a terminal through SSH, rather than through the Jupyter Hub / Jupyter Notebook interface. Instructions for connecting can be found in the general Snellius user manual. Typically, you'll just want to connect using
ssh <username>@snellius.surf.nl |
where your username is the same as your username for Jupyter Hub. More information can be found in the HPC User Guide.
Downloading/uploading large numbers of files
The quickest way to upload or download a large number of files may be by connecting to Snellius through an SCP or SFTP client. This is explained in the HPC User Guide (Connecting to the system).
Using customized hooks
The JHS_hooks folder contains two hooks: one called env and one called script.
The environment hook
The env hook can be used to change the environment and is sourced (sourcing is the way Linux systems change the current environment) whenever you or a student starts a Jupyter Notebook server. The default env hook will load a number of so-called modules. Modules are the way that on Snellius, we can offer multiple versions of the same software. By default, we load the modules needed to run the Jupyter Notebook servers, and support a Python 3 and R kernel. At this time, these are the following modules:
module load 2022 |
Unless you really know what you are doing, we don't advise you to change these default modules or any of the environment variables that are set in the default env script. You can however add to it. For example, if you happen to be familiar with the module environment on Snellius, you can leverage the env hook to load any additional module you like. Do make sure that they are compatible with the modules that provide the Jupyterhub and R kernel (i.e. for the modules above, that means the foss-2019b, but please check your current env script to see what the current modules are that are loaded by default).
Additionally, you can set environment variables in this script. For example, the default script sets
PYTHONPATH=/home/<teacherlogin>/JHS_installations/Python/lib/python${PYTHON_MAJ_MIN}/site-packages:$PYTHONPATH |
This enables the default functionality that new Python / R packages installed in the corresponding prefixes are automatically found by Python / R. You can expand on these if you feel the need to install Python or R packages in other, non-default locations, but be aware that only the JHS_* directories are by default readable to your students.
Of course, you can also use the env hook to set any other environment variables here that you might need.
IMPORTANT: note that changes to the env hook only take effect after you've restarted the Jupyter Notebook Server.
The script hook
The script hook is executed whenever you or a student starts a Jupyter Nobeook server. The default script hook takes care of synchronizing the JHS_notebooks folder. Again, we advise to leave the default lines untouched, but your are free to add additional commands that you would like to get executed at startup. There are many possible uses, such as synchronizing additional folders, enabling notebook extensions, etc. A sample script might look like:
#!/bin/bash |
IMPORTANT: note that changes to the script hook only take effect after you've restarted the Jupyter Notebook Server.
Installing additional software
You may want to install additional software. As an example, let us install the 'ncdu' program (https://dev.yorhel.nl/ncdu), a utility to analyse disk usage on Linux systems. Here, we are again assuming your are in a terminal session - either logged in through SSH or by starting a terminal from the Jupyter Notebook server.
In this example, we start in the home directory, create an ncdu subfolder in the JHS_installations directory, download the sources, and then install the ncdu program in the ~/JHS_installations/ncdu prefix:
cd |
Now that we have installed the ncdu software, we need to make sure it is found by setting the correct PATH environment variable. We do this through the env hook, so that if our students start a notebook, they can run the ncdu executable. Thus, we add the following line to the env script:
PATH=/home/lcurs000/JHS_installations/ncdu/bin:$PATH |
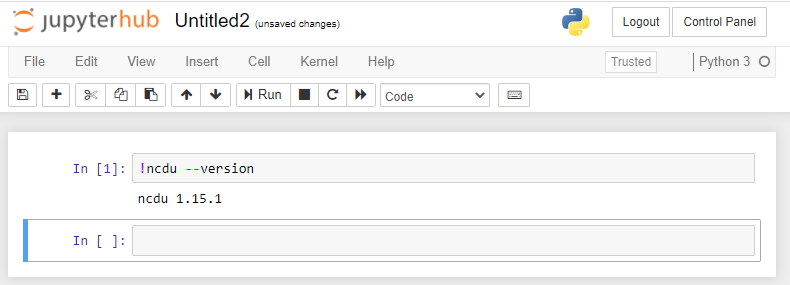
After these steps, if you or the students start a new Jupyter Notebook server, the ncdu executable will be available. For example, if in the Jupyter Notebook environment we go to 'New' and start a 'Terminal', we can execute the ncdu command:

Note that you can also execute commands on the command line from e.g. a Python notebook by starting a command with an exclamation mark (!)
Using Python virtual environments
Before you start
Using Python virtual environments has some pro's and con's:
- Pro: you can start with a clean environment (if you don't use --system-site-packages, see below) and thus be completely independent from which packages we offer by default
- Pro: you can install multiple virtual environments. If for one notebook you need a particular python package X version 1.0, while you need version 1.2 for another notebook, you can create two virtual environments, and create two custom kernels: one to run each notebook with.
- Con: the system packages are generally well optimized for the hardware we use, and may therefore be slightly faster
- Con: we provide a lot of functionality out of the box, such as notebook extensions. These depend on python packages and may break in your virtual environment (unless you use --system-site-pacakges)
- Con: we have experience and can help you with the default kernels, as we know the exact software environment in which they are installed. With virtual environments, you are on your own (with power comes responsibility!).
- Con: the default kernels get used a lot, and therefore issues are resolved and/or documented to the benefit of all users.
The pro's and con's also indicate why you might want to use --system-site-packages: if you want to profit from our system installations, but e.g. still need to run multiple versions of the same package for different notebooks.
Steps for creating a custom kernel based on a Python virtual environment
You can use Python virtual environments through Jupyter Notebooks, but a couple of steps are needed.
- Create a virtual environment in the JHS_installations directory
- Install the package 'ipykernel' in the virtual environment
- Install python packages in the virtual environment (as you normally would)
- Set Unix permissions so that files/folders within the virtual environment are group readable
- Create a hook that installs the ipython kernel for each student, so that your Jupyter Notebook server will find it
After these steps, you will see the Python virtual environment as an additional item if you go the the 'New' menu in a Jupyter Notebook server.
Creating a Python virtual environment in the JHS_installations directory
There are two possibilities for creating a virtual environment: either you build upon the python packages already available on the system
virtualenv --system-site-packages ~/JHS_installations/venvs/my_env |
or you start with a completely clean environment
virtualenv ~/JHS_installations/venvs/my_env |
The first approach will allow you to e.g. still use the system numpy installation, which is well optimized for our CPUs. The second approach however allows you more flexibility and control over the environment, since the only packages that will be available are the ones you install.
Installing packages in the Python virtual environment
Assuming we have created the virtual environments in the previous step, we can now activate them, and install additional packages. The first thing we need to install is the ipython kernel, since that will allow us to start a Jupyter Notebook based on this virtual environment later on. Then, we can install any additional packages (here, for example, we install the 'values' package):
source ~/JHS_installations/venvs/my_env/bin/activate |
Create hook that installs the kernel from the Python virtual environment for each student
To install the kernel for each student, we add to following lines to the script hook:
module purge |
IMPORTANT: we purge all modules here, because otherwise the ipykernel install will pick up on the global installation of ipykernel and fail to install the local kernel spec. Since purging temporarily changes the environment, we advise to put this section of code all the way at the bottom of the script hook, so that other parts of the script hook are not affected by the purge.
Note that as '--name' you can provide whatever you feel is most descriptive. Now, this virtual environment shows up as a seperate kernel in the 'New' menu in a Jupyter Notebook (you may have to reload your Jupyter Notebook web page):
If we start the 'my_env' kernel, we will be able to import the 'values' Python package.
Using Conda virtual environments
This section describes how to install a custom kernel based on your own Conda environment. Such an environment will still use SURFs default software stack to run the Jupyter Server itself , but the kernel comes from your conda environment - and thus has access to all the packages you installed there.
Before you start
Using Conda virtual environments has some pro's and con's:
- Pro: you can start with a clean environment (if you don't use --system-site-packages, see below) and thus be completely independent from which packages we offer by default
- Pro: you can install multiple virtual environments. If for one notebook you need a particular python package X version 1.0, while you need version 1.2 for another notebook, you can create two virtual environments, and create two custom kernels: one to run each notebook with.
- Pro: while installing additional python packages for our default environment is easy and quick (pip install --prefix ...), installing additional non-python software may be more work and require more skill (see our section on Installing additional software). This may be easier with conda. Note that alterntively, we might be able to provide some of these dependencies at the system level so you wouldn't need a conda environment. You can enquire what is the best approach by sending in a servicedesk ticket.
- Pro: some packages nowadays only give instructions on how to install with conda, with conda virtual environments you'd still be able to use those in our Jupyter environment.
- Con: the system packages are generally well optimized for the hardware we use, and may therefore be slightly faster
- Con: we provide a lot of functionality out of the box, such as notebook extensions. These depend on python packages and may break in your virtual environment (unless you use --system-site-pacakges)
- Con: we have experience and can help you with the default kernels, as we know the exact software environment in which they are installed. With virtual environments, you are on your own (with power comes responsibility!).
- Con: the default kernels get used a lot, and therefore issues are resolved and/or documented to the benefit of all users.
- Con: Jupyter Notebook Extensions and Jupyter Server extensions installed in the conda environment only work if they are compatible with the version of Jupyter Notebook / Jupyter Server from the default SURF software stack. See "Using Conda virtual environments to completely replace the default software environment" below if you run into this issue.
The pro's and con's also indicate why you might want to use --system-site-packages: if you want to profit from our system installations, but e.g. still need to run multiple versions of the same package for different notebooks.
Steps for creating a custom kernel based on a Conda virtual environment
You can use Conda virtual environments through Jupyter Notebooks, but a couple of steps are needed.
- Create a Conda virtual environment in the JHS_installations directory
- Install the kernel you would like to use (e.g. 'ipykernel' for a Python kernel) in the virtual environment
- Install any packages in the virtual environment (as you normally would)
- Set Unix permissions so that files/folders within the virtual environment are group readable
- Create a hook that installs the ipython kernel for each student, so that your Jupyter Notebook server will find it
After these steps, you will see the Conda virtual environment as an additional item if you go the the 'New' menu in a Jupyter Notebook server.
Creating a Conda virtual environment in the JHS_installations directory
To create a Conda virtual environment called 'my_env' in the JHS_installations directory, open a terminal from the Jupyter Notebook environment (New → Terminal) and run:
conda create --prefix ${TEACHER_DIR}/JHS_installations/conda/envs/custom_python |
(N.B. if the conda command is not available, contact us via the servicedesk to help you. We are working on making this available in the default environment)
NOTE: If you get the error "NotWritableError: The current user does not have write permissions to a required path.", simply run it again once or twice. This is a known bug in conda.
Installing packages in the Conda virtual environment
The first time, you may first need to run
conda init bash |
(only needed if your prompt doesn't show '(base)' before your user name). If you had to run this command, close your terminal, and open a new terminal from the Jupyter Notebook environment. You should now see the '(base)' before your username.
Then, activate the conda virtual environment with the full path and install the ipykernel package, and any additional conda packages you want to install. Finally, in the last command, we make sure that the permissions are set correctly so that all students can read these files as well.
conda activate ${TEACHER_DIR}/JHS_installations/conda/envs/custom_python |
If you want to install an R kernel instaed of a python kernel, run
conda activate ${TEACHER_DIR}/JHS_installations/conda/envs/custom_rkernel |
instead.
Create hook that installs the kernel from the Conda environment for each student
Finally, we add the following to the script hook the following section of code. For the Python kernel, we add:
# If kernel is not installed yet, install kernel for this user |
IMPORTANT: we purge all modules here, because otherwise the ipykernel install will pick up on the global installation of ipykernel and fail to install the local kernel spec. Since purging temporarily changes the environment, we advise to put this section of code all the way at the bottom of the script hook, so that other parts of the script hook are not affected by the purge.
If instead we want to install an the R kernel, we add the following to the script hook:
# If kernel is not installed yet, install kernel for this user |
Using Conda virtual environments and replacing the default Jupyter Server
The Jupyter Server is the server that provides you with the graphical interface in your web browser (i.e. where you see your directories and files). For example, it runs a JupyterLab or Jupyter Notebook interface. The previous instructions list how to run a custom kernel on top of a Jupyter Server, Jupyter Notebook and/or JupyterLab interface provided by SURFs default environment. However, if you want to use Jupyter Notebook and Jupyter Server extensions that are not compatible with SURFs version of Jupyter Server, Jupyter Notebook or JupyterLab, these extensions will not work.
To circumvent this issue, you can install a Conda virtual environment and adapt our environment and script hooks so that the Jupyter Server is used from your Conda environment , instead of from the SURF default environment. This should ensure compatibility of your installed Jupyter Notebook and Server extensions with the Jupyter Server (since both are installed in your own conda environment). However, it does put extra constraints on your Conda environment as to ensure that it is compatible with SURFs JupyterHub.
Before you start
Using this setup has pro's and con's, on top of the general pro's and con's mentioned for the general Conda setup above.
- Pro: this setup gives you the most freedom and control over your environment
- Con: you will need to ensure that compatbile versions of
batchspawnerandjupyterhubare installed in your conda environment
Creating a conda environment to completely replace the default software
The following steps are needed:
- Create a Conda virtual environment in the JHS_installations directory
- Install a version of
batchspawnerandjupyterhubthat is compatible with SURFs JupyterHub - Install a jupyter-based graphical interface, e.g.
jupyterlab - Install a relevant kernel, e.g.
IPython. Possibly, the installation of the jupyter-based graphical interface has already installed this. - Install any packages in the virtual environment (as you normally would)
- Set Unix permissions so that files/folders within the virtual environment are group readable
- Modify the
JHS_hooks/envhook to make it load your Conda environment by default
Creating a Conda virtual environment in the JHS_installations directory
To create a Conda virtual environment called 'my_env' in the JHS_installations directory, open a terminal from the Jupyter Notebook environment (New → Terminal) and run:
conda create --prefix ${TEACHER_DIR}/JHS_installations/conda/envs/custom_python |
(N.B. if the conda command is not available, contact us via the servicedesk to help you. We are working on making this available in the default environment)
NOTE: If you get the error "NotWritableError: The current user does not have write permissions to a required path.", simply run it again once or twice. This is a known bug in conda.
Installing packages in the Conda virtual environment
The first time, you may first need to run
conda init bash |
(only needed if your prompt doesn't show '(base)' before your user name). If you had to run this command, close your terminal, and open a new terminal from the Jupyter Notebook environment. You should now see the '(base)' before your username.
Then, activate the conda virtual environment with the full path and install a compatible versons of batchspawner and jupyterhub . Currently, that is jupyterhub version 4.0.2 together with the commit 2a9eda060a875a2b65ca9521368fe052a09c3266 of batchspawner (there are no recent releases for batchspawner unfortunately). We expect these versions to be used at least until summer 2024, but if you intend to create this type of setup, feel free to confirm with our helpdesk. Also, we need some graphical interface, in this example, we install jupyterlab , but you could instead install notebook for a traditional Juptyer Notebook interface.
To do this:
conda activate ${TEACHER_DIR}/JHS_installations/conda/envs/custom_python |
Making sure the Conda environment gets used to start the Jupyter Server
Next, we need to alter the environment script. We do several things here:
- Make sure the default software environment is not loaded by commenting out the relevant
module loadstatements - Add a
module load mamba/<some_version>(a conda drop-in replacement, but more efficient) module. Check which versions are available by executingmodule av mambafirst in a terminal. - Comment out all definitions of
PYTHONPATH,R_LIBS,PATH,JUPYTER_PATHorJUPYTER_CONFIG_PATHenvironment variables (if you find that certain components from your conda environment are not being found, you may need to set some of these to point to the correct prefix within the conda environment).
Now, our JHS_hooks/env script looks for example like:
# We comment all modules, but add a module load Mamba: |
Note that after this, the default software environment no longer works. Because we commented out the above environment variables, regular installations in JHS_installations are no longer begin picked up either: the only thing you have now, is the conda environment.
Creating additional shared directories
To create additional shared directories, three steps are needed:
- Creating the directory itself on shared course storage
- Setting the correct permissions on the directory using ACLs
- Creating links in the home directories of those users that need to see the directory
In the explaination below, we'll create two directories as an example:
- teachers: a directory that is readable, writeable and exectuble for teachers, but not readable, writeable or executable for students
- shared: a directory that is readable, writeable and exectuble for all teachers and students in the course
N.B. While the term 'executable' may seem strange for a directory, it means that a user can open and enter that directory.
Creating the directory on shared course storage
Open a terminal from the Jupyter Notebook environment (New → Terminal) and run
mkdir -p ${TEACHER_DIR}/teachers |
Setting the correct permissions (ACLs)
There are two groups that we can use to control permissions: the jhsXXXDDD_teacher and jhsXXXDDD_access groups, where XXXDDD corresponds to the unique identifier assigned to your course that is also in the URL for your JupyterHub. These groups contain all of the teacher and student logins respectively. First, we will set the permissions for the teachers directory (again, using a terminal). Here, we give read and write permissions to all users in the group jhsXXXDDD_teacher:
setfacl -m g:jhsXXXDDD_teacher:rwx teachers |
(replace the XXXDDD in the command, and all of the ones below, with the identifier for your course).
Next, we set another ACL on this directory that determines the default ACL for newly created files and directories within the teachers directory.
setfacl -d --set g:jhsXXXDDD_teacher:rwx teachers |
This way, if one of the teachers would create a new file within the teachers directory, it would immediately get the correct file permissions and be readable, writeable and executable for the other teachers too.
Now, we will set the ACLs for the shared directory. Here, we want to give read, write and execute permissions both to teachers and students. This time, we immediately set the default ACL as well.
setfacl -m g:jhsXXXDDD_teacher:rwx shared |
Finally, let's check that we set our ACLs correctly:
getfacl shared |
getfacl teachers/ |
That looks exactly as we intended.
Symlinking the shared directory
Now, we need to make sure that this directory can easily be accessed from the Jupyter Notebook Server. The JHS_hooks/script hook is executed every time a user starts a Jupyter Notebook Server. We can use that make sure the new symlinks get created whenever a student or teacher starts their notebook server.
First, we will create two new functions in the JHS_hooks/script file. In these functions, we first check for the existence of a hidden file. If that doesn't exist, we will create the symlinks and the hidden file. That way, we can guarentee the setup is only done once for each teacher/student.
function setup_custom_symlinks_teacher() |
N.B. It may seems strange that we nested the shared symlink for students within their JHS_notebooks directory. However, that is because the Jupyter Notebook Server for students by default starts in that directory.
Now, we have to make sure those functions are called. There should already be a section
if [[ ! -z $(id -nG | grep 'teacher') ]]; then |
in the JHS_hook/script file. The first part of this if-statement is only execute for teacher logins. The second part is only executed for student logins. Thus, we can call the two functions in this if-else statement:
if [[ ! -z $(id -nG | grep 'teacher') ]]; then |
Note that we need two setup_custom_symlinks_* functions, because we want to symlink the teachers directory only for teachers. If you want to create a shared directory that is visible to both students and teachers, you would only need one function setup_custom_symlinks, and you could call that function outside (e.g. below) the if-else statement like this:
if [[ ! -z $(id -nG | grep 'teacher') ]]; then |
Now, restart your Jupyter Notebook Server. If all went well, you should see the new directories appear as soon as your Juypter Notebook Server has restarted. If you also received a student login, it's highly recommended to also start a new Jupyter Notebook Server with that as well, to see if the students also see the correct directories now.
Modifying permissions on shared directories
WARNING: do not alter the permissions of the JHS_* directories. Some of these are needed for the Jupyter environment to function correctly. This might lead to hard-to-debug issues. If you accidentally changed permissions of one of the JHS_* directories, please inform our helpdesk.
In some cases, you may want to alter the permissions on existing shared directories. For example, if you students had to hand in exercises before a certain deadline, you could strip their write permissions at the time of the deadline.
The cleanest way to modify ACLs is to remove all of them, and then re-add the ones you want. For example, suppose we have a directory handin. And suppose it currently is readable, writeable, and executable to both students and teachers:
getfacl handin/ |
Now, we want to remove all permissions for students. What we do is remove all ACLs, and add the read/write/execute permissions for the teachers back in:
setfacl --remove-all handin |
Finally, we check again if the correct permissions are now set:
getfacl handin/ |
Note that the students will still have the symlinks to this directory in their home directory. But, they won't be able to actually enter the directory, because they don't have that permission anymore.