There are two main ways to login to your workspaces.
Roughly said, to workspaces with a Web User Interface the preferred way of logging in is Time-Based One Time Password (TOTP), which also implicates two factor authentication.
On the other hand, Workspaces with a Command Line Interface can be accessed via SSH.
Prerequisites
When following along with one of these step-by-step guides, make sure that you have a running workspace (see How to get on board).
Workspace Access with TOTP
Preinstalled services like web access (e.g. R-studio, Jupyter Notebook) or other login services (Windows, Ubuntu Desktop) that require a username and password can be accessed by using a "time-based one time password" (TOTP).
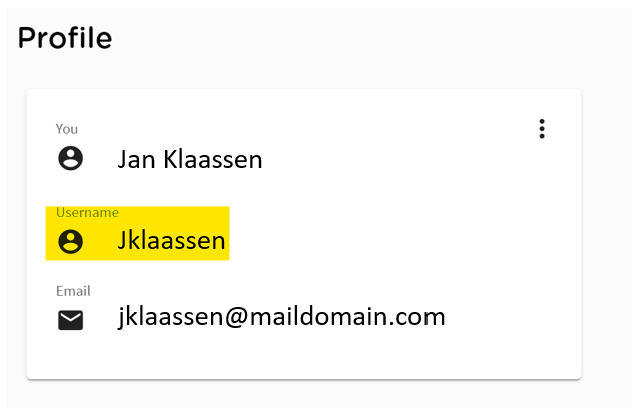
On the "Profile" tab of the Research Cloud portal you can review your username:
If you have not yet registered for TOTP, you will see a notification like this on the same page:

Click on it, in order to register.
Otherwise, if there is an earlier TOTP registration, just use the menu under the three stacked dots in the upper right and choose "Reset time based password".
Both ways, you will be presented with a screen with further instructions and a QR-code:
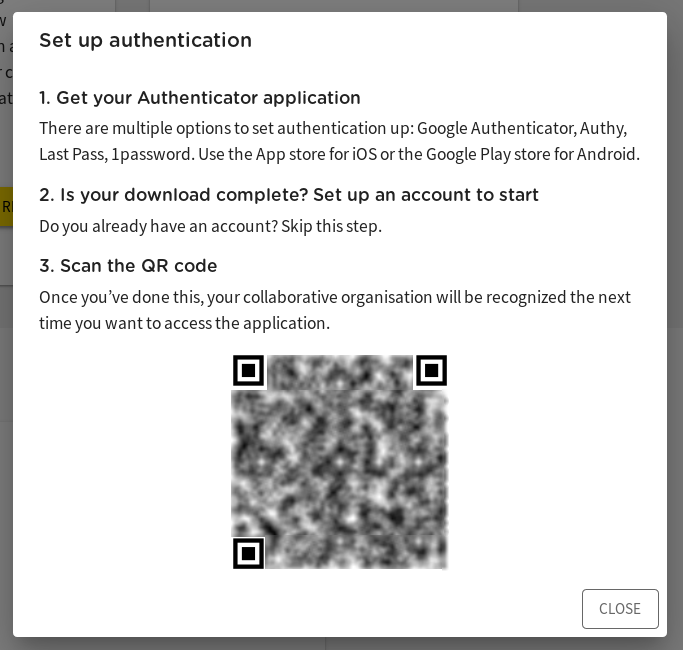
Follow the instructions, there.
If you have more than one CO, make sure that you edit the name of the new entry in your app such that you can recognize which CO it is for.
Once you have registered, you can access your workspaces with TOTP.
Go to your workspaces overview on your Research Cloud Dashboard page and select a workspace with a web interface (like R-Studio, Jupyter Notebook etc.).
Extend the workspace-display by clicking on the downward arrow on the right.
Then, on the lower right, click on the "ACCESS" button.
In a new browser tab, you will be presented with a login dialog (example is for a R-Studio workspace):
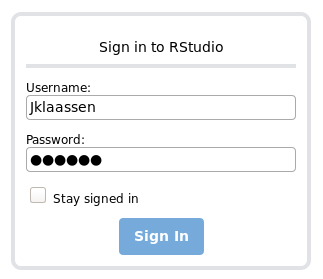
The username is the username that is given on your "Profile" tab in the Research Cloud portal.
Have the password generated by your chosen two factor authentication app on your smartphone. In the app, use the entry that matches the CO of the workspace.
That way, you can access your workspace through your browser.
Accessing a Windows workspace
Accessing a Windows workspace follows the same pattern as the other applications using TOTP.
The only other thing that is required is a rdp client on your local computer.
- If your local computer is running Windows, you already have one built-in (look for "rdp").
- On a Mac, you can install "Microsoft Remote Desktop".
- For Linux, several applications can be installed - e.g. "Remmina".
If the access button does not work directly, just copy/paste the workspace's ip address into the rdp client and it should work.
Here is a video that demos the login procedure to a Windows workspace: Windows login [4:14]
Access a workspace with SSH
SSH access is only needed if you'd like to connect to your server directly. SSH access to a workspace is only possible by OpenSSH Key.
Use the RSA format
Please note the the private/public key-pair you use was generated using the RSA format. If you have a key of a different format, create another one that is based on RSA.
Most key generators use RSA as the default format.
When the text of your public key starts with "ssh-rsa" your key-pair is in the right format.
To access the workspace you need to follow the following 2 steps:
- Add the public key into SRAM. (You only have to do that once.)
This will set your public key into your profile. - Access the workspace with SSH.
Use your favourite/available own SSH client to connect to your workspace.
Add public key into SRAM. (only has to be done once)
To SSH login to your workspace you have to add your public SSH key into you account. It needs to be added to the SRAM authentication website.
- Open the SRAM page : https://sbs.sram.surf.nl/home
- In the top right click on the "Login" button to login.
- Enter your mail address to be redirected to your SSO login page. (Depending on your institute and identity provider this page can be different for different users)
- Once you are logged in, click on the downward arrow next to your name in the top right of the page. Select the "Profile" menu item.
- In the SSH public key field, you can enter your public key from your local public key file. We recommend to use the file upload button for this in order to prevent copy-paste errors. (See the illustration below.)
- Click the "Update" button at the bottom of the page.
- The update of the public key can take up to 5 min to take effect in Research Cloud.

Access the workspace with your SSH-client
There are several ssh clients to access your workspace and you can use the one you like as long as it supports public keys.
Linux and Mac
When you are working from a Linux machine, the SSH commands are already installed and ready to be used from a terminal.
On a Mac the SSH command is also available by default.
Windows 10 or Windows Server 2019
If your local computer runs Windows 10 or Windows Server 2019, SSH is supported, too.
Use a Powershell terminal to issue ssh commands.
You can generate a private/public keypair with:
ssh-keygen
(Just use all the defaults by hitting enter, or do enter a passphras if you wish.)
You log in with:
ssh <ResearchCloud username>@<workspace ip address>
More info on ssh on Windows
If you want to read more on ssh on Windows you can check here:
https://docs.microsoft.com/en-us/windows-server/administration/openssh/openssh_install_firstuse
https://docs.microsoft.com/en-us/windows-server/administration/openssh/openssh_keymanagement
Mind you, you only have to install and configure the SSH client.
In the case of Research Cloud, the "server" is the workspace you will log in to and SSH is already installed, there.
Older Windows versions
If you are running older versions of Windows, we recommend GitHub Desktop or MobaXterm.
These separate pages describe how to set up these tools: