GridFTP is an extension of the File Transfer Protocol (FTP) for grid computing. It is optimized for parallel transfers and high-bandwidth networks but requires additional configuration, tools and set up. The archive supports the most widely used implementation, Globusonline.
Performance Limiting Factors
Independent of the transfer protocol, the underlying file systems can be a limiting factor for high performance transfer and should be taken into account.
Requirements
Grid certificate
To use this service, you must have a Sectigo grid certificate. Check that your institution provides this service as it will be obtained using your institutional login. If it does not, you cannot use GridFTP to transfer your data.
Instructions on how to obtain your certificate can be found here. If you only plan to use your certificate for GridFTP, you do not need to go beyond the section on making your certificate suitable for eScience use.
Access to grid tools
To use Globusonline you will need access to a proxy. To create a proxy, you will need access to the grid tools. The grid tools are available on Snellius and Spider. If you do not have access to either of these services, you will need to create a gridUI account. Instructions on obtaining a gridUI account can be found here. More details about configuring grid tools on Snellius will be available shortly.
Installation
Once you have verified that you have created a grid certificate and have access to the grid tools, you can begin the installation process.
Verify certificate format
Login to the grid:
ssh <login>@ui.grid.surfsara.nl
Look inside the .globus folder:
ls -l /home/<login>/.globus
The folder should contain the following two files:
lrwxrwxrwx.    1 <login>  <group>   65 Mar  1 09:36 usercert.pem -> cert-<name>_<login>_surf_nl_issued_1_Mar_2023.pem
lrwxrwxrwx.    1 <login>  <group>   64 Mar  1 09:37 userkey.pem -> key-<name>_<login>_surf_nl_issued_1_Mar_2023.pem
Generate and share your DN
Create a proxy:
voms-proxy-init
Run grid-proxy-info to find your DN:
grid-proxy-info
- Copy the string after identity from the output as this is your DN. Then create a ticket in the service deskto send us your DN and to have it added to the approved list on the archive.
Example DN:
identity: /DC=org/DC=terena/DC=tcs/C=NL/O=<your org> B.V./CN=<your name> <your email>
Verify that you can connect to the archive endpoint
After you’ve received confirmation from the service desk that your DN has been added, it is a good idea to check that you can now connect to the archive endpoint.
Login to the grid:
ssh <login>@ui.grid.surfsara.nl
Create a proxy:
voms-proxy-init
See if you can query the archive endpoint and connect to your home directory:
globus-url-copy -list gsiftp://archive3.surfsara.nl:2811/home/<login>/
If you see the files and folders of your archive home directory, the end point is working. If not, comment on your DN service desk ticket so we can help you further.
Generate myProxy
Run
myproxy-init:ssh <login>@ui.grid.surfsara.nl myproxy-init -l <any name>
Whatever login you select under
<any name>will be your myProxy login. The first prompted pass phrase you are prompted for is your GRID pass phrase, followed by a new myProxy pass phrase (entered twice to confirm).
Set up and connect to a Globus Connect account
- Go to the following website and create an account using your institutional login, google account, or ORCiD.
- Navigate to the file manager and search for
surf#archiveunder Collection:
- Provide the path to your desired archive folder (in this case your home folder) and fill in your myProxy login and password:
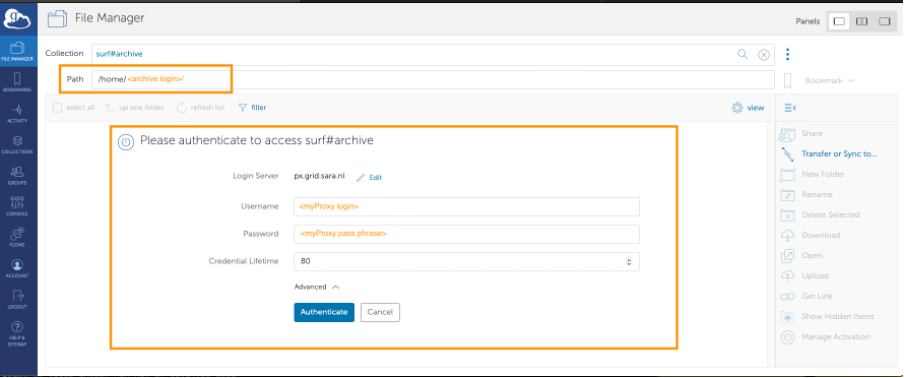
Once you have successfully authenticated, you will be able to transfer files to and from your archive folder.
Transferring Data
Transferring with a local machine
You can transfer files between the archive and your local machine by setting up a grid endpoint using Globus Connect Personal. Details on how to do so can be found here.
- Follow the linked instructions.
- Select your personal endpoint.
- On the file manager tab, select the folders your are interested in.
- Start the transfer by hitting the Start button.

- You can monitor the transfer on the Activity page or wait for the email report to be sent upon successful transfer.

Transferring with an institutional grid system
You can transfer files to and from the archive and a server by activating the server’s dCache endpoint using the instructions found here.
- Follow the linked instructions.
- Verify in the web interface that the dCache endpoint is activated as a Globus Online endpoint.
- Select the dCache endpoint.
- On the file manager tab, select the folders your are interested in.
- Start the transfer by hitting the Start button.

- You can monitor the transfer on the Activity page or wait for the email report to be sent upon successful transfer.
